2 months ago
Wednesday, December 16, 2009
Woodwright school
Well it has finally happened. Roy Underhill has opened his own school. 'bout time. Anyway we all knew of its existence about a year ago but they finally have it all going and even a schedule. You can find it at www.woodwrightschool.com. The prices seem inline with other schools and the projects are what you would expect. I hope one day to be able to attend even for just a seminar.
Thursday, November 26, 2009
Friday, November 13, 2009
Monday, October 5, 2009
Tuesday, September 15, 2009
Alexis 3001 Dual flush/Low Flow Toilet
So this is way off topic for this blog, but this is a great product and needs to be reviewed.

We were shopping at Sam's club and I saw they had "Alexis 3001 Dual flush/low volume toilet in a box" on the rack. I have never seen these at Sam's and they were $100 each. Have you priced such an item lately? They regularly go for $200 at your local big box hardware store or $300 at a kitchen/bathroom showroom. I jotted down the model and went to google to find some info on them. All of the reviews were excellent, not a bad one in the lot and now I know why. We have had them in for a month now and no hiccups yet. They are quieter than the ones they replaced, vintage 1963 water hogs, but that's no surprise. Low volume, yes the refill time is 8-15 secs. depending if you choose flush 1 or 2. As far as assembly goes, everything and I mean everything you need is in the box, all the screws, bolts and even a toilet seat are in the box.
The only hiccups I had on installation were 1) the flange on the drain pipe was rusted out so that needed to be fixed and 2) whoever installed the water shut off valve put it at an angle and so the connection hose that was supplied was just quite not long enough. Both of those issues are not related to the toilet though.
If you need a new throne to sit on, I give this one a hardy thumbs-up!
Friday, September 11, 2009
Plasma car
I know it's way off topic for this blog but. I want (no really my kids want it) a plasma car and the great lady at this blog (mommy23monkeys) is giving one away. If you have not seen or driven a plasma car, go forth and find one. Plasma car makers site.
Tuesday, August 4, 2009
VACATION
Hello, Sorry it's been a while. If you think this is sporadic, just wait. I will be leaving town with my family for a month going on a road trip to do and see lots of things. I will take pics of the things I have completed before we go and post them just so you didn't think I was just sittin' round being lazy.
Friday, May 15, 2009
Thursday, April 16, 2009
Wooden Mallet
So the other day I wanted a wooden mallet. I could pay the $15-30 for a beech or maple mallet that I would smash up eventually. Or, I could build my own out of some scrap material I had laying in the wood bin. Google "simple wooden mallet" and someone has already done the leg work for me. Thank you Sawdust making. It really is a good simple mallet that I won't mind banging up, why, because "I brought you into this world and I can make another just like ya". Anyways that money saved can go to wood for another project.
Things I did different:
Handle is 12" x 1.5"
Head is 3" tall
I adjusted the interior dimensions to accommodate the changes. I started with a piece of nice red oak 3/4" x 3.5" and tried to expand or contract dimensions to cut as little as possible.
Start of glue up. The 2 interior pieces glued to the handle.


Exterior slabs glued on:

Now time for the spoke shave to smooth the faces and round the handle.


I will drill for dowels through and through so it all stays together longer. I am not sure of the finish I think I might just leave it the way it is. All and all I think it was worth the time, 2 nights and money, FREE.
Tuesday, March 3, 2009
Compost bin
So the next project is .......the outdoor compost bin. Why? Well right now our compost pile is really just a pile, two actually, and they need a little help to be contained. So in scouring the web to find a design I liked I came upon this:

This is from the Riverside California waste management site. I like the layout but the changes will be : No top, at least for now and some of the screening will be wood slats. I will try and make the front slats removable, either separately or section by section. I have salvaged deck material from the in-laws that this will be made from. They are 2x6x12 treated lumber, most of the treatment has worn off but it is still very usable. This is the same lumber that the garden beds were constructed from. I think using 2x6 material is a bit overkill for this so to begin I am going to rip some in half and have 2x3x12 to work with. The whole unit will be screwed together unless I can find a better way.

This is from the Riverside California waste management site. I like the layout but the changes will be : No top, at least for now and some of the screening will be wood slats. I will try and make the front slats removable, either separately or section by section. I have salvaged deck material from the in-laws that this will be made from. They are 2x6x12 treated lumber, most of the treatment has worn off but it is still very usable. This is the same lumber that the garden beds were constructed from. I think using 2x6 material is a bit overkill for this so to begin I am going to rip some in half and have 2x3x12 to work with. The whole unit will be screwed together unless I can find a better way.
Saturday, February 28, 2009
Kids Bookcase
The kids bookcase is done. Its three sections wide on top (29") and two on the bottom (36"). I have to get a picture of the one at the library so you can see what I was going for. It is pretty much built so the kids can dance on it and it won't break. The bottom is 3/4" plywood and the top is 5/8" pine. The ply was salvaged from the side of the road and the pine was from our kitchen remodel. When I tore the kitchen out I saved as much of the built-in stuff as I could. I could have left the top un-painted but it had stains all over so it would have been much work to make it look nice. Anyway over all it turned out well and fits its function.


Next project is.....?


Next project is.....?
Wednesday, February 25, 2009
Workbench and Bookcase
So here is the finished workbench. I say "finished" but I think it will always be a work in progress. Adding something here and there, planing the top to make it smoother and taking out nicks. I think it came out OK considering it was my first try and it was completely built from scrounged lumber. So in essence it was free just my labor.

Sitting on the bench is the bottom to the kids bookcase. The lighting for the picture is horrible. It really is painted gloss white (easy cleaning).
 Here is the top to the bookcase. It still needs painting and then attached to the bottom. I gave up on the finger joints for the sides and just used a butt joint with a through dowel. It is plenty strong and since it will be painted I figured there is no need to get really fancy. I will post a final picture, in good lighting, when it is done (maybe a few days).
Monday, February 23, 2009
Woodwrights School
Roy Underhill, host of the PBS show "The Woodwrights Shop", has finally opened his own school of woodworking. Since I don't want to copy the flyer, Here is the link. Below is a picture of Roy and his new school.

PS. I promise to update about the workbench and Kids bookcase

PS. I promise to update about the workbench and Kids bookcase
Friday, February 6, 2009
Workbench is standing
Well here is an almost finished workbench.
This is a shoot of the top

And here is how I put the legs together. I originally wanted to do bridal joints but it was not looking good. So the half lap it is.

So far the only thing I have bought to put this together is glue. But I have used that on other things so really its $0 outlay. I have the stretchers to put on across the front and back and the 2x4 "backsplash". Then the final will be to hand plane the top. Lots and lots of fluffy shavings.
Friday, January 30, 2009
More finger joints and workbench
so this is where I am at on the workbench. This will be the main width of the top with an 8" tool space added to the rear. This will bring it to a total of ~29" deep. I have been using reclaimed 2x4 material from a renovation going on up the street. Some of the 2x4's are not full length so I have tried to space them 1 full 2x4, 1 partial, 1 full.....I also have tried not to have the joints over lap at any point. This has been more work but my goal is not to buy any lumber for this workbench.

Here are the legs. 2 come from a 4x4 header and 2 are laminated 2x4's.

This is a shot of an almost done finger joint. I have to trace out the pattern on the other piece of wood, cut and do a final fitting. Lots more work but it will look good.


Here are the legs. 2 come from a 4x4 header and 2 are laminated 2x4's.

This is a shot of an almost done finger joint. I have to trace out the pattern on the other piece of wood, cut and do a final fitting. Lots more work but it will look good.

Sunday, January 18, 2009
Finger joints/ Workbench
The rough cut of the finger joints on the long pieces of the "V" top have been cut. Now I have to go back with a chisel, chop out the rest and fine tune. I will then transfer the finger spacing to the side boards and do it all again. Top is on the left, bottom on the right.

I have 5 2x4's in my lamination for my workbench top done. I have maxed out the jaws on one of my clamps, so I have to build another 2 more sets of 5 and find some way to put them all together. The arrangement for the workbench top will be 15 2x4's on edge, 1 2x6 flat and 1 2x4 on edge. This way I have about 16" of work depth with a 6" tool tray and a backer the same height as the front to support long pieces.


I have 5 2x4's in my lamination for my workbench top done. I have maxed out the jaws on one of my clamps, so I have to build another 2 more sets of 5 and find some way to put them all together. The arrangement for the workbench top will be 15 2x4's on edge, 1 2x6 flat and 1 2x4 on edge. This way I have about 16" of work depth with a 6" tool tray and a backer the same height as the front to support long pieces.

Mish mash
On the left: shooting board, on the right: start of workbench.
I made the shooting board to help square the edges of the kids bookcase. It worked pretty well but a sharp plane is needed otherwise it chatters.
The workbench will have a laminated top. On the right is the beginning of that. I have salvaged 2x4's from a remodel that's going on up the street. I have to take out nails and remove any dirt but it is free and will work fine. The workbench design will be a blend of roubo (link 2) and "Bob and Daves' good fast and cheap" (link pdf).

Saturday, January 17, 2009
Kids Bookcase
I have the pieces to the top all roughed out. So now you can finally see the "V" taking shape. I think I will just do a finger joint for the sides. I just don't feel comfortable cutting dovetails on angled grain yet. I will be adding a divider in the middle so as to have 2 sections.


This is a close-up of the boards I am using for the top. These were from the kitchen re-model we did recently. They are very nice single plank boards 11 1/2" wide. These would cost about $5 ft. new. That's alot of money saved.

Also, I will be making a shooting board to trim the ends of the pieces.


This is a close-up of the boards I am using for the top. These were from the kitchen re-model we did recently. They are very nice single plank boards 11 1/2" wide. These would cost about $5 ft. new. That's alot of money saved.

Also, I will be making a shooting board to trim the ends of the pieces.
Thursday, January 15, 2009
Yep, It's a box
The bottom is done to the kids bookcase. Well, the rough-in of it anyway. Still need to sand, trim and paint. Yes, you heard me right, the base will be painted. I will put the base coat of white, then I might let my daughters (4 and 18mths) spruce it up a bit. It is for them ya'know. The top "V" just gets a good coat of paste.
I had just found how to make my own paint over at Robin Woods blog. I think I might try it here.

I had just found how to make my own paint over at Robin Woods blog. I think I might try it here.

Wednesday, January 14, 2009
Here is the start of the bottom of the kids bookcase. The "V" will rest on top of this piece.

Here is a detail of the corner. This is the rear. The back panel will fit in the recess created by the wood blocking that was glued to the side. As a note, I should have lowered the glue blocks so the top would rest only on them and not the side and the block. This would have created a rabbet and more stable joint. Oh well, live and learn. I have not cut the bottom for it yet, hopefully that will come tomorrow.


Here is a detail of the corner. This is the rear. The back panel will fit in the recess created by the wood blocking that was glued to the side. As a note, I should have lowered the glue blocks so the top would rest only on them and not the side and the block. This would have created a rabbet and more stable joint. Oh well, live and learn. I have not cut the bottom for it yet, hopefully that will come tomorrow.

Its Cold
Freezing temps kept me from doing much woodworking last night. The place I do my wood work is an unheated backroom addition to the house. Glue does not like to set up and fingers go numb when it is that cold. So, the wife and I sat down and played games on the Wii. A good time letting the brain go, blah (except for playing tetris, you really have to think to play that).
Monday, January 12, 2009
Kids bookcase 2
I have the side of the bookcase in clamps at the moment. I have either the top of the bottom portion or the bottom of the bottom portion cut. I am not sure which as I want to see the other piece cut and then I will decide which is which.
I am up in the air on the top "V" design. I was thinking about using a dovetail for the side pieces but I am a little hesitant about cutting dovetails in angled grain. I should mention that for the top I have some really nice old pine boards that were salvaged when we remodeled the kitchen. The other way of attaching the sides was using a through tenon on oversized side pieces. The bookcase is not being done in any particular style just copying what is at the library. The library shelves are melamine coated particle board, so anything I do is above and beyond.
I am up in the air on the top "V" design. I was thinking about using a dovetail for the side pieces but I am a little hesitant about cutting dovetails in angled grain. I should mention that for the top I have some really nice old pine boards that were salvaged when we remodeled the kitchen. The other way of attaching the sides was using a through tenon on oversized side pieces. The bookcase is not being done in any particular style just copying what is at the library. The library shelves are melamine coated particle board, so anything I do is above and beyond.
Saturday, January 10, 2009
Shoerack Bench finished
Here is the finished Shoerack/Bench. I believe it turned out good. As with all things one makes, you can always pick out the imperfections. There were good lessons learned on this project which can be applied to future works.


I finished it with just a coating of Minwax Paste (Natural finish). I did not want to stain it, it would have turned blotchy for sure looking at the wood now. Most of our furnishings in the house are lightly finished anyway (notice the bamboo flooring), so it will blend it quite nicely. There is no gloss to the finish yet. I think I will do another coat in a few days after we live with it for awhile.


I finished it with just a coating of Minwax Paste (Natural finish). I did not want to stain it, it would have turned blotchy for sure looking at the wood now. Most of our furnishings in the house are lightly finished anyway (notice the bamboo flooring), so it will blend it quite nicely. There is no gloss to the finish yet. I think I will do another coat in a few days after we live with it for awhile.
Kids Bookcase
Here is the plan for the kids bookcase. The top is a "V" shape so the books will be upright and facing you. You can flip through them easily that way. The bottom will be for storing books like a normal bookshelf, spine out.


Wednesday, January 7, 2009
Frankenstein?
Almost complete. All that's left to do is chop the dowels, sand and finish. So far, so good. I went with a chisel and chipped all excess glue out. That Gorilla glue sure does foam up. I went and bought a bottle of Titebond II and see how that works. I glued the dowels in with it and it sure is easier to clean up.

And here it is in its maiden voyage doing what it was built to do.

Beginning this weekend I will start the kids bookcase. It will be about 2ft. tall, 14" deep and 32-36" wide. I am not sure of the width yet because I don't know what I can get from the scrap plywood I have lying around. The bookcase will be from all scrap lumber I have about the house. The only tough part about it will be the dado I want to make to slide the back into. I have two ways in mind though to do it. I will let ya'll know which way worked for me.
The post title come from the fact that the bench looks like frankenstein with the long dowels sticking out.
Tuesday, January 6, 2009
Shoerack/Bench 3
Here is the current incarnation of the Shoerack/Bench. It is almost done. I need to drill the holes for the 3/4" dowel, these will be placed at the back of each shelf to support long shoes (ie. Hill family shoes). I will be using a brace and auger bit to drill the holes. I got the brace from amazon and the auger bit from Lowes.
This is a shot of the front.

This is a shot from the rear. The dowels are trimmed off, but there is glue still poking out everywhere.
 I will be trimming all the glue off, giving it a light sanding and rounding all the edges. For the finish I have decided to use Minwax Paste wax (Natural color).
This is a shot of the front.

This is a shot from the rear. The dowels are trimmed off, but there is glue still poking out everywhere.
 I will be trimming all the glue off, giving it a light sanding and rounding all the edges. For the finish I have decided to use Minwax Paste wax (Natural color).
Monday, January 5, 2009
Shoerack Bench 2
Here is a photo of the rails clamped on the shoerack/bench. I put rails on the top front and back to support the seat and then one rail on the bottom. The bottom rail will be in front and serve to keep the sides from splaying out and as the catch to keep shoes on the shelf. If you look you will see I added dowels to the sides for reinforcement. I will be adding those to the rails after they dry and to the shelves after they are installed.

Here is a close-up of the dowels. They are 1/4" oak and extend 1" into the top. I'm not sure they really add that much strength but I always like they way the look. Obviously they will be trimmed flush once dry.

Here is a close-up of the dowels. They are 1/4" oak and extend 1" into the top. I'm not sure they really add that much strength but I always like they way the look. Obviously they will be trimmed flush once dry.

Sunday, January 4, 2009
Shoerack Bench
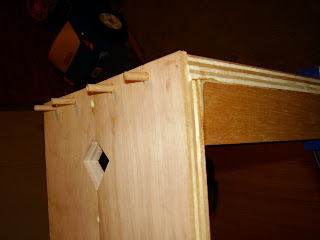
So here is the background to the wood in this project. I work in a scientific laboratory and get all sorts of deliveries. The pallets that scientific equipment comes on are usually hand built and if of European decent, than it is birch plywood. This wood came from pallet that an ultracentrifuge from Germany was shipped on. It is NICE wood. Anyway on to the details.
I cut the sides as a stack so the diamond detail would be accurate and line up. The bottom was cut the same way.

I took each side half separately and cut the rabbet to accept the top. In hind sight I should have waited till I had the sides glued together to cut the rabbet because now I have some trimming to do to make the top sit flat in the rabbet.

I then glued the sides and top halves together to form solid pieces. After trimming the rabbets and squaring the top, one side and the top were glued. Tonight I will trim the other rabbet and glue that to the top.

Saturday, January 3, 2009
Garden Beds part 2
I got the 3 of 4 beds together. Here is a detail of the corner. Each corner is secured by 1, 3 1/2" drywall screw in each direction. Nothing fancy, but will last for a long time.

Here you can see the beds in place. With the chicken coop in the back ground.


Here you can see the beds in place. With the chicken coop in the back ground.

Friday, January 2, 2009
Garden Beds
I started making more raised garden beds today. The wood came from my in-laws. They tore down their deck and asked if we wanted any of it. This is PT wood that has been outside for about 10 years. 1 face is OK and 1 face is good. I took half of what was there (all that would fit in my little pick-up). Its all 2x6x at least 8 ft. This is a great use for this wood that would have been thrown to the curb.
So, I picked the longest ones I could (12ft) and cut a simple overlap for the corner. I had used butt joints before but this will be much stronger and last longer. I cut the short sides stacked up all in one go. Made the cross cut and then popped out the remaining piece with a chisel. It is a satisfying sight to line up a chisel, give it a few good mallet whacks and POP; out comes the trash. I then cut the long sides two at a time. I got through four boards before I was needed for childcare duty. I will do the other four later. My wife says "I think you just like making small chunks" as there were many 1 1/2 x 2 5/8 x 1 1/2 end pieces laying about.
So, I picked the longest ones I could (12ft) and cut a simple overlap for the corner. I had used butt joints before but this will be much stronger and last longer. I cut the short sides stacked up all in one go. Made the cross cut and then popped out the remaining piece with a chisel. It is a satisfying sight to line up a chisel, give it a few good mallet whacks and POP; out comes the trash. I then cut the long sides two at a time. I got through four boards before I was needed for childcare duty. I will do the other four later. My wife says "I think you just like making small chunks" as there were many 1 1/2 x 2 5/8 x 1 1/2 end pieces laying about.
Adventures in Handtool Woodworking
This will be all about my adventures in woodworking. I will post more about who I am and what this blog is all about.
Subscribe to:
Posts (Atom)