Friday, January 30, 2009

More finger joints and workbench

so this is where I am at on the workbench. This will be the main width of the top with an 8" tool space added to the rear. This will bring it to a total of ~29" deep. I have been using reclaimed 2x4 material from a renovation going on up the street. Some of the 2x4's are not full length so I have tried to space them 1 full 2x4, 1 partial, 1 full.....I also have tried not to have the joints over lap at any point. This has been more work but my goal is not to buy any lumber for this workbench.


Here are the legs. 2 come from a 4x4 header and 2 are laminated 2x4's.


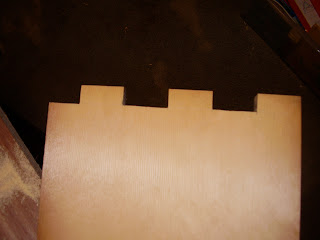
This is a shot of an almost done finger joint. I have to trace out the pattern on the other piece of wood, cut and do a final fitting. Lots more work but it will look good.


Sunday, January 18, 2009

Finger joints/ Workbench

The rough cut of the finger joints on the long pieces of the "V" top have been cut. Now I have to go back with a chisel, chop out the rest and fine tune. I will then transfer the finger spacing to the side boards and do it all again. Top is on the left, bottom on the right.


I have 5 2x4's in my lamination for my workbench top done. I have maxed out the jaws on one of my clamps, so I have to build another 2 more sets of 5 and find some way to put them all together. The arrangement for the workbench top will be 15 2x4's on edge, 1 2x6 flat and 1 2x4 on edge. This way I have about 16" of work depth with a 6" tool tray and a backer the same height as the front to support long pieces.

Mish mash

On the left: shooting board, on the right: start of workbench.

I made the shooting board to help square the edges of the kids bookcase. It worked pretty well but a sharp plane is needed otherwise it chatters.

The workbench will have a laminated top. On the right is the beginning of that. I have salvaged 2x4's from a remodel that's going on up the street. I have to take out nails and remove any dirt but it is free and will work fine. The workbench design will be a blend of roubo (link 2) and "Bob and Daves' good fast and cheap" (link pdf).

Saturday, January 17, 2009

Kids Bookcase

I have the pieces to the top all roughed out. So now you can finally see the "V" taking shape. I think I will just do a finger joint for the sides. I just don't feel comfortable cutting dovetails on angled grain yet. I will be adding a divider in the middle so as to have 2 sections.


This is a close-up of the boards I am using for the top. These were from the kitchen re-model we did recently. They are very nice single plank boards 11 1/2" wide. These would cost about $5 ft. new. That's alot of money saved.


Also, I will be making a shooting board to trim the ends of the pieces.

Thursday, January 15, 2009

Yep, It's a box

The bottom is done to the kids bookcase. Well, the rough-in of it anyway. Still need to sand, trim and paint. Yes, you heard me right, the base will be painted. I will put the base coat of white, then I might let my daughters (4 and 18mths) spruce it up a bit. It is for them ya'know. The top "V" just gets a good coat of paste.

I had just found how to make my own paint over at Robin Woods blog. I think I might try it here.

Wednesday, January 14, 2009

Here is the start of the bottom of the kids bookcase. The "V" will rest on top of this piece.


Here is a detail of the corner. This is the rear. The back panel will fit in the recess created by the wood blocking that was glued to the side. As a note, I should have lowered the glue blocks so the top would rest only on them and not the side and the block. This would have created a rabbet and more stable joint. Oh well, live and learn. I have not cut the bottom for it yet, hopefully that will come tomorrow.

Its Cold

Freezing temps kept me from doing much woodworking last night. The place I do my wood work is an unheated backroom addition to the house. Glue does not like to set up and fingers go numb when it is that cold. So, the wife and I sat down and played games on the Wii. A good time letting the brain go, blah (except for playing tetris, you really have to think to play that).